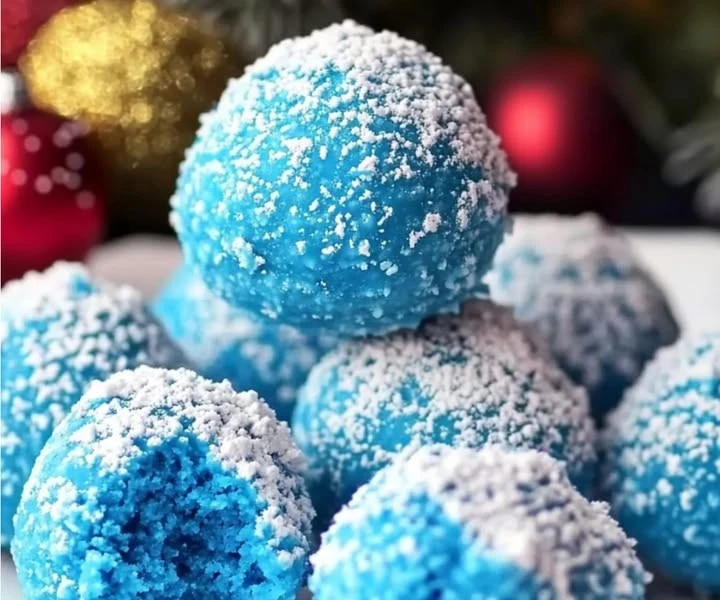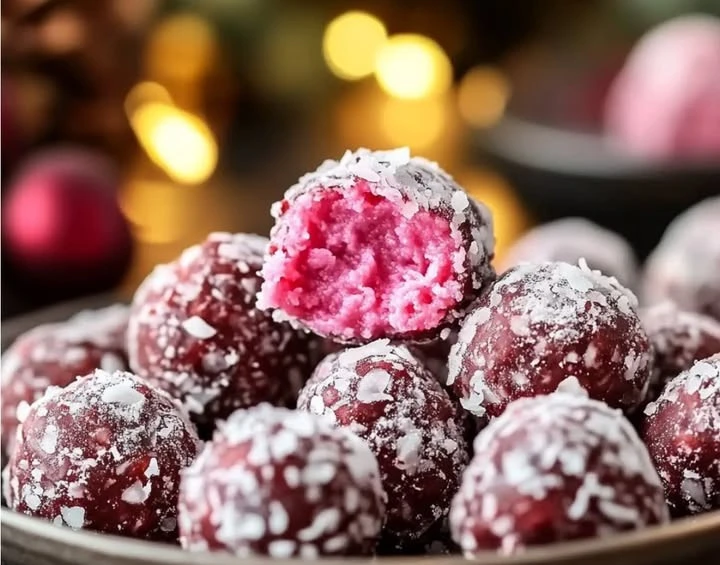
Cherry Mash Truffles
Cherry Mash Truffles are a delightful treat that brings together the rich flavors of peanut butter, chocolate, and juicy cherries. This dessert is not only delicious but also reminds many of joyful times spent making candy during the holidays with family. The sweet and salty combination of ingredients creates a unique flavor that is hard to resist. In this article, we will explore why you will love this recipe, how to prepare Cherry Mash Truffles, and some tips for making them even better.
Why You Will Love This Recipe
There are many reasons to love Cherry Mash Truffles. First and foremost, they are incredibly tasty! The combination of creamy peanut butter and dark chocolate, along with bright cherry flavors, creates an explosion of taste in every bite.
Another great reason to love this recipe is its versatility. You can customize the truffles to suit your taste preferences. Whether you want extra peanut butter or a more pronounced cherry flavor, you can easily adjust the ingredients.
Moreover, making Cherry Mash Truffles is a fun activity. You can include friends and family in the preparation process. This makes it a great option for parties, holidays, or simply a cozy weekend at home.
Lastly, Cherry Mash Truffles make a perfect gift. Packaging them nicely can create a thoughtful and personalized present for friends and loved ones.
How to Prepare Cherry Mash Truffles
Preparing Cherry Mash Truffles is simple and fun. This recipe does not require any special tools or complicated techniques. With just a few ingredients and steps, you can create a delicious batch of truffles to share or enjoy yourself.
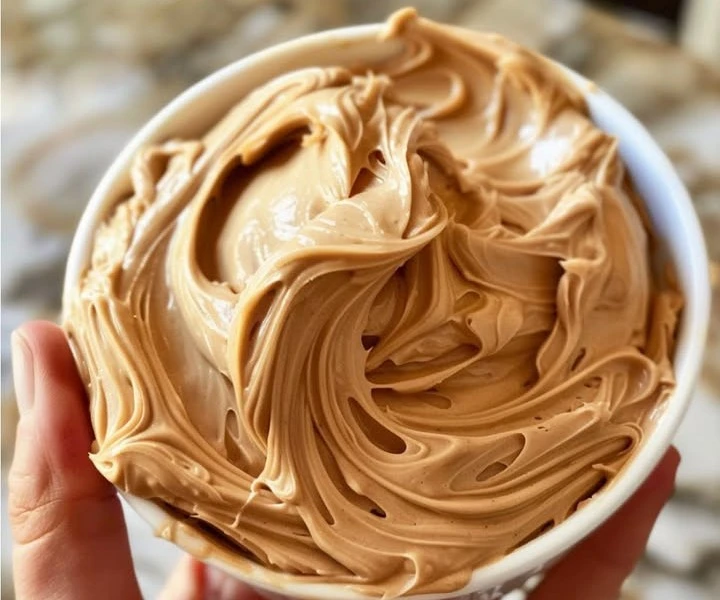
Ingredients:
- 1 cup creamy peanut butter
- 1 cup powdered sugar
- 1 cup chopped cherries (fresh or dried)
- 1 teaspoon vanilla extract
- 8 ounces dark chocolate (for coating)
- Sea salt (optional, for garnish)
Instructions:
Mix the Peanut Butter and Sugar: In a medium bowl, combine the creamy peanut butter and powdered sugar. Stir well until the mixture is smooth and creamy.
Add Cherries and Vanilla: Next, fold in the chopped cherries and vanilla extract into the peanut butter mixture. Make sure the cherries are evenly distributed throughout the mixture.
Shape the Truffles: Using your hands, scoop and roll the mixture into small balls, about 1 inch in diameter. Place the shaped truffles onto a baking sheet lined with parchment paper.
Chill the Truffles: Once you have shaped all the truffles, place the baking sheet in the refrigerator. Let the truffles chill for about 30 minutes or until they are firm.
Melt the Chocolate: While the truffles are chilling, you can melt the dark chocolate. You can do this in a microwave-safe bowl in the microwave or over a double boiler. If using a microwave, heat in short intervals of 30 seconds, stirring in between until melted and smooth.
Coat the Truffles: Once the truffles are firm, take them out of the refrigerator. Dip each truffle into the melted chocolate, ensuring it is fully coated. You can use a fork to lift the truffle out of the chocolate, allowing any excess chocolate to drip off.
Let Them Set: Place the chocolate-coated truffles back on the baking sheet. If you’d like, sprinkle a pinch of sea salt on top for an added flavor contrast. Allow the chocolate to set at room temperature or place them back in the fridge for about 10-15 minutes.
Enjoy: Your Cherry Mash Truffles are ready to be enjoyed!
How to Serve Cherry Mash Truffles
Serving Cherry Mash Truffles is easy and fun. You can present them in a variety of ways to make them more appealing. Here are some ideas:
On a Platter: Arrange the truffles on a beautiful serving platter. You can add some decorative touches, like fresh cherries or mint leaves, for a pop of color.
In a Jar: Place the truffles in a clear glass jar with a lid. This creates an adorable display that shows off the delicious treats inside.
Gift Boxes: If you are giving them as gifts, you can package the truffles in small gift boxes or bags. Tie them with a ribbon for a nice touch.
Cherry Mash Truffles are great for parties, as dessert for a special dinner, or simply as a sweet treat any time of the day.
How to Store Cherry Mash Truffles
Storing Cherry Mash Truffles properly will help them last longer and maintain their delicious flavor. Here are the best ways to store them:
In the Refrigerator: Place the truffles in an airtight container and store them in the refrigerator. They will stay fresh for up to 2 weeks in this way.
At Room Temperature: If your kitchen is cool, you can store the truffles at room temperature for a day or two. Make sure to keep them in a cool, dry place and cover them to prevent dust or insects from getting to them.
Freezing: If you want to make a large batch and save some for later, you can freeze the truffles. Place them in a single layer on a baking sheet and freeze until solid. After they are frozen, transfer them to a freezer-safe container or bag. They can be kept in the freezer for up to 3 months. When ready to enjoy, simply thaw them in the refrigerator before serving.
Tips for Preparing Cherry Mash Truffles
To make the preparation process smoother and ensure that your Cherry Mash Truffles turn out perfect, here are some handy tips:
Choose Quality Ingredients: Using good quality peanut butter and chocolate can greatly enhance the flavor of your truffles. Opt for a brand you love.
Be Patient with Chilling: Don’t skip the chilling step. Chilling the truffles helps them hold their shape when you coat them in chocolate.
Experiment with Coatings: While dark chocolate is traditional, you can try coating your truffles in white or milk chocolate for a different taste.
Add More Flavor: If you want to add more flavor, consider mixing in some crushed nuts or a splash of cherry flavored liqueur for a twist.
Use a Melting Pot: If you have one, a melting pot is a great way to keep your chocolate warm and perfect for coating.
Variation
One of the fun things about Cherry Mash Truffles is that you can adjust the recipe to create different flavors. Here are some ideas for variations:
Chocolate Cherry Truffles: Omit the peanut butter and increase the amount of cherries. Use cherry-flavored chocolate for an extra kick.
Nutty Truffles: Add chopped nuts to the mixture for a crunchy texture. Walnuts or pecans work great with the cherry and chocolate flavors.
Coconut Cherry Mash Truffles: Fold in some shredded coconut into the peanut butter mixture for a tropical twist.
Spiced Truffles: Add a pinch of cinnamon or nutmeg to the peanut butter mixture for a warm flavor.
Frequently Asked Questions
Can I use fresh cherries instead of dried ones?
Yes, you can use fresh cherries! Just make sure to chop them finely and remove the pits before adding them to the mixture.What kind of chocolate should I use?
Dark chocolate is commonly used for coating, but you can use milk or white chocolate based on your preference. Each type will give a different flavor profile.Can I make these truffles gluten-free?
Yes, all the ingredients in this recipe are naturally gluten-free. Make sure to check the labels on your ingredients to ensure they are certified gluten-free.How do I know when the truffles are done chilling?
The truffles should feel firm to the touch after about 30 minutes in the refrigerator. They should hold their shape when rolled into a ball.Can I double the recipe?
Absolutely! This recipe can easily be doubled or even tripled if you want to make a larger batch for a crowd.
Conclusion
Cherry Mash Truffles are a sweet delight that blends the flavors of chocolate, cherries, and peanut butter into a treat that everyone will love. With an easy preparation method, simple ingredients, and plenty of room for creativity, you will have a fun and rewarding experience making these truffles.
Whether you’re looking to impress guests, create a special gift, or enjoy a delicious snack yourself, Cherry Mash Truffles are a perfect choice. Make them for your next gathering or just because, and delight in the sweet flavors that are sure to bring smiles all around!