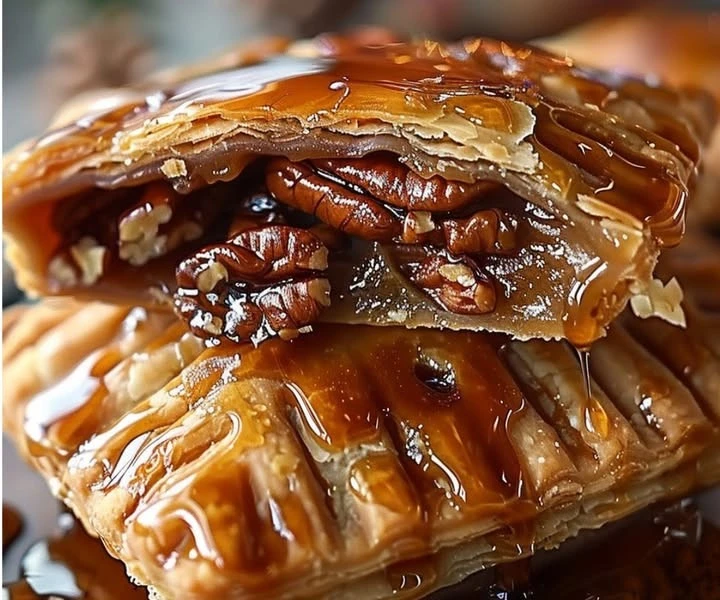
flaky goodness of puff pastry with the sweet and tangy taste of cherry pie filling
Introduction
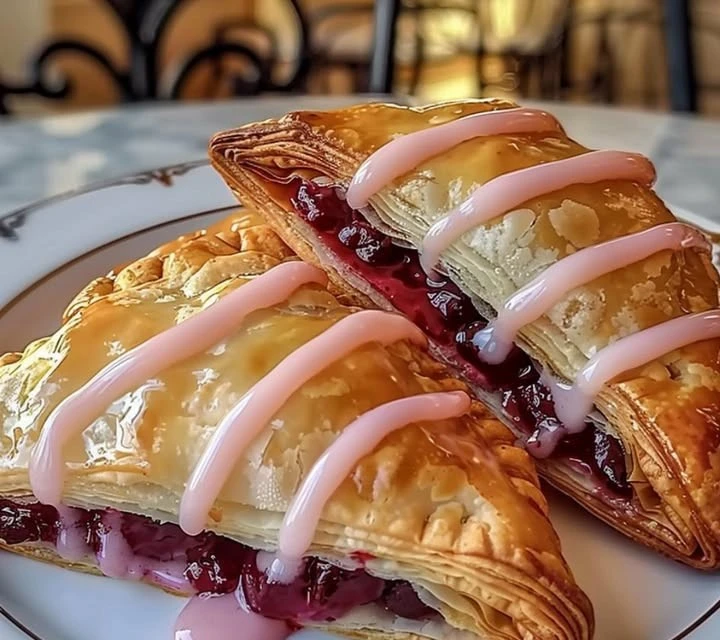
Are you looking for a delightful dessert that will have your kids begging for more? Look no further! This recipe combines the flaky goodness of puff pastry with the sweet and tangy taste of cherry pie filling. It’s a simple and delicious treat that can brighten any day. Whether you’re making a family dessert, a snack, or serving guests, this recipe will impress everyone. Let’s dive into this mouthwatering creation that your kids (and you) just can’t resist!
Why you’ll love this recipe
This recipe is quick and easy to prepare, making it perfect for busy parents. The combination of puff pastry and cherry filling creates a delightful treat that feels special but doesn’t require hours in the kitchen. Plus, it’s versatile! You can serve it warm or chilled, with or without glaze – the choice is yours. The joy on your kids’ faces when they take their first bite will be enough to make this dessert a regular favorite in your household.
How to prepare My kids couldn’t get enough, and neither will you!
Preparing this cherry-filled treat is as easy as 1-2-3! With just a few simple ingredients and steps, you can whip up a dish that’s not only tasty but also looks beautiful. Here’s how to do it:
Ingredients:
- 1 package of puff pastry (2 sheets)
- 1 cup fresh or canned cherry pie filling
- 1 egg + 1 tbsp milk (for egg wash)
- 1 cup powdered sugar
Instructions:
Preheat the oven: Start by preheating your oven to 400°F (200°C). This step is crucial for achieving a perfectly baked pastry.
Prepare the puff pastry: Roll out the puff pastry sheets on a lightly floured surface. If you’re using frozen puff pastry, ensure it has thawed properly before rolling it out. Cut each sheet into squares or rectangles, depending on your preference.
Add the filling: Place a small spoonful of cherry pie filling in the center of each pastry piece. Be careful not to overfill, as this can make sealing the pastry difficult.
Seal the pastries: Fold each piece of pastry over the filling to create a triangle or rectangle. Press the edges together to seal them. You can use a fork to crimp the edges for a decorative touch.
Make the egg wash: In a small bowl, whisk together the egg and milk. This will give your pastries a beautiful golden color as they bake.
Brush with egg wash: Using a pastry brush, lightly brush the tops of the pastries with the egg wash. This step not only adds color but also helps give a nice shine to the finished dessert.
Bake the pastries: Place the sealed pastries on a baking sheet lined with parchment paper. Bake in the preheated oven for 15-20 minutes or until they are golden brown and puffed.
Prepare the glaze: While the pastries bake, you can make the glaze. In a bowl, mix the powdered sugar with a little water or milk until you reach your desired consistency.
Glaze the pastries: Once the pastries are done baking and have cooled slightly, drizzle the glaze over the top for added sweetness.
Serve and enjoy: Your delicious cherry pastries are ready to be enjoyed! Serve them warm and watch your kids delight in every bite.
How to serve My kids couldn’t get enough, and neither will you!
Serving these pastries is as simple as placing them on a plate and watching everyone dig in. You can serve them warm right out of the oven, or let them cool a bit and enjoy them at room temperature. They make a great addition to parties, family gatherings, or as an after-school treat.
Consider adding a scoop of vanilla ice cream on the side for an extra special dessert, or dusting them with a little extra powdered sugar for that perfect finishing touch. Your kids will love them, and so will you!
How to store My kids couldn’t get enough, and neither will you!
If you have any leftovers (which is rare!), you can store the pastries in an airtight container at room temperature for up to 2 days. If you prefer, you can keep them in the refrigerator for a longer shelf life, up to a week.
To reheat, simply pop them back in the oven at 350°F (175°C) for about 5-10 minutes until warmed through. This helps keep the pastry nice and flaky!
Preparation tips for My kids couldn’t get enough, and neither will you!
Thaw the pastry: Make sure to thaw your puff pastry in the fridge overnight or at room temperature for about 30 minutes before starting. This will make it easier to work with.
Don’t overfill: It’s tempting to add a lot of cherry filling, but too much can cause the pastries to ooze out while baking. Keep the filling to about a tablespoon per pastry.
Experiment with flavors: While cherry is a classic, feel free to try other fruit fillings like blueberry, apple, or peach. Just adjust the sweetness as needed.
Make ahead: You can prepare the pastries in advance, seal them, and store them in the fridge for up to a day before baking. This saves you time on busy days.
Variation
If you want to change things up, consider adding a sprinkle of cinnamon to the cherry filling for a warm and cozy flavor. You could also try adding a little cream cheese or almond extract to the filling for an extra layer of taste!
Frequently asked questions
1. Can I use frozen cherries instead of pie filling?
Yes! You can use fresh or frozen cherries. If using fresh, be sure to pit and chop them. If using frozen cherries, let them thaw and drain any excess liquid before using.
2. How long does it take to bake these pastries?
Typically, they take about 15-20 minutes to bake at 400°F (200°C). Keep an eye on them, as baking times can vary slightly depending on your oven.
3. Can I freeze the pastries after baking?
Yes! You can freeze baked cherry pastries. Place them in a single layer on a baking sheet until frozen, then transfer them to an airtight container. They can be stored in the freezer for up to 3 months.
Now that you have all the details, you’re ready to make this fantastic cherry pastry recipe that your kids will love, and so will you! Enjoy baking, and most importantly, enjoy sharing this delightful treat with your loved ones!